Thursday, September 27, 2018

Painting

It's really the finishing touches on the walls for this bathroom remodel. I ran the molding around all of that shiplap to finish it off. Also had to finish the mud/tape/sand process on the drywall, and it turned out pretty smooth even if the framing behind it is crap.

with molding

molding here too

Drywall is done

cove molding over there too
We decided just to get the whole bathroom white. Started with a coat of kilz primer since we had plywood, painted drywall, and new drywall to cover up. Getting a consistent color with no bleed through was going to be tough enough, kilz it. While I had the kilz out, I also primed over the orange color in the bedroom.We already had some lilac picked up for the bedroom. But the tiny bathroom being white should make it feel bigger.

a white wall

more white

We couldn't get all of the furniture out of the way to kilz the entire bedroom

More of the bedroom
After the kilz went on, it was time for final painting

installed the medicine cabinet and lights

Now it's purple with a bit of orange left


And I was able to install the top shelf
So I got the walls done, then was able to put up the medicine cabinet and lights, also replaced the GFCI outlet in the wall. Getting to install the top shelf was really cool, but now it's time to shred that tile floor and install something else.

Tuesday, September 25, 2018

Masonry time

Kelley had a good idea. It's not an unusual occurrence, but when it leads to more work for me I might hesitate to go along with it. She was scared that masonry was going to be hard to learn and thought there was a pretty good chance that I was going to fuck up the front of the house if my first time trying to lay brick was on the front porch foundation. So the good idea was that I should try a test project, something small in the backyard. Take the same approach I wanted to do for the front porch and fuck up a small corner of the backyard instead of the dead center of the front of the house.

So I decided to build a table or a bench or something. The technique to comply with the building code was to pour a 6" thick foundation slab that extended at least 2" beyond the brick on all sides, and deep enough to get at least 2 bricks underground. After some layout options, I went with a rectangle pattern that took 10 bricks per course. Used the dry run to measure the outline for the foundation. So let's dig!

That's a hole

It's kind of a deep hole

Then I filled it in with concrete

Nice foundation
Perhaps I could have gone a bit deeper. Isn't that usually the case with concrete? I poured two 80 lb bags of high-strength quickrete in there and let it cure for about 48 hours. The key, I think, is that it came out perfectly flat and smooth. This would turn out to be a key. It's level and flat.

I used 60 lbs bags of Quickrete Mortar Mix to set the brick. It was easy and consistent, just add water. No mixing mortar and sand to get the ratio just right, this was simple. I could set 4 courses (or 40 bricks) with one bag of mortar mix. The key to the entire project is getting the first row down right.

My first course of brick ever


How I really feel about masonry

First four courses are down!
I had to get the corners on the first row exactly square. The thickness of the mortar between the brick and the foundation had to create a level first course. I used a 2' level and a speed square to be sure everything was exact. Once the first course was down, level, and square, the next 3 courses went up pretty quickly.

When you get too many courses of brick laid down too quickly, the weight of the brick and mortar can compress the lower courses so I decided to stop there. Plus I didn't really want to mix up another full bag of mortar and lay 4 more courses of brick that afternoon. So I went ahead and tuck pointed those 4 rows and called it a day. Totally forgot to wash the brick down.

I learned how to lay brick totally from watching youtube videos. By the end of this setup, my back was really hurting. This may turn out to be a really cool bad idea!

Saturday, September 22, 2018

Making Shelves

The most expensive part of this bathroom remodel is actually the shelves for the new closet! Kelley came with me to the local lumberyard because she wanted to be picky about the material we used so I insisted she come over to pick it out with me. I just wanted some plain cedar, but she wanted something thick and chunky. Fine, let's see what they got. American Woodyards is amazing. Cheap, and tons of inventory for both air-dried and kiln dried lumber. I'm buying a bunch of oak from them for my sailboat as I need it.

Today we looked at a bunch of stuff, even found some walnut that was $3/bf cheaper than what I paid for my recent end table project. Found the cedar I wanted. Also found some rough cut pine that I need for some siding on a shed. She really liked some super light wood, I forget the species. But then we saw some cypress, 2x12's for only $3/bf. At the time, we were thinking that the closet was going to be 7' long, and these were 10' boards. So I bought 4 of them. Turns out rough cut 9/4" x 12" x 10' means that those 4 boards had 80 boardfeet. Kelley paid for them while I loaded up the truck, she didn't tell me until we were off the yard that she cut the check for $240 plus tax. for shelves. in an upstairs bathroom closet that almost never gets used. yeah.

thick stuff!


Fortunately, that white drain pipe got in the way (see my last post) when I opened up that wall, so the shelves ended up only being exactly 5' long. So I started by rough cutting the 4 pieces I needed from only 2 of the boards, then returned the other 2. Still, at $120 for shelves it is the most expensive part of this bathroom remodel.

I rough cut the boards to length, then ran a hand power planer over them. I don't know why I didn't run them through the big planer. The cypress is pretty heavy, and the big planer is only 12.5". Maybe the boards were too wide? or just bulky. I got some strange lines from the hand planer, but overall it worked out pretty good.

Both boards for the top shelf
Cypress is a very light colored wood that is naturally oily and porous. This means it is very resistant to decay and normally reserved for outdoor use. We wanted a bit of a warmer look for these shelves. The only woodworking I had to do was cutting to length, ripping to width and to get straight edges, then scribing to the back wall to work around those non-square corners. Behind the drywall and shiplap, I put 2x4 braces so they would be very sturdy and I wouldn't need any center supports. All of the time that goes into building shelves is in the finish.

To finish the cypress I used the same process that I found for the walnut table, with the additional step to add a stain.

Belt sander with 80 grit sandpaper
Random orbit sander with 120 grit
Wet sand with tung oil & 220 grit sanding block to fill the pores
Since cypress is oily, let this dry for 48 hours
Wipe on stain with Minwax Colonial Maple color. Just the wood finish stain, not the stain + poly
Sanding block with 220 grit
Minwax wipeon satin polyurethane, a solid coat. It absorbs fast there.Still let it dry for 48 hours
Sanding block with 320 grit
Coat #2 of the wipeon poly
Sanding block with 400 grit
At least 4 more coats of poly with #0000 steel wool in between
Feel the wood. When it starts to feel hard, like plastic, put on one more coat. then you're good.

Stained on top of the rough cut cypress

Stained, plain, and planed cypress

Sanded and stained shelf boards on the original rough cut
You can see from the pictures that the stain highlighted some inconsistencies in color between the sapwood and the heartwood that might not have been revealed if I had stuck with a clearcoat.

So these shelves had to be strong and chunky. Putting chunky things in a small room make it feel more cozy I guess? There has to be an interior design theory here. Regardless, we love the way the shelves turned out.

Bottom shelf is sized

Strong enough to hold up a fat carpenter
I had to finish the rest of the painting, flooring, and molding before I install these shelves permanently. It all came together better than I really expected. But that's another post.

Friday, September 21, 2018

Shiplap accent wall

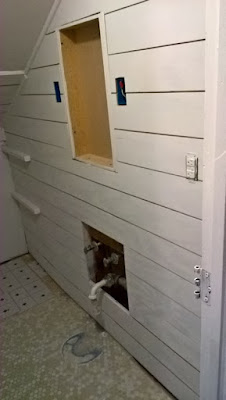
I already did a post on how to make your own shiplap, and the process was really cool. This is going to be more of a picture post about installing it. We wanted to make some upgrades to this bathroom, and add as much storage as possible. So we went from one light to two, and put them on each side of a medicine cabinet. Also while the wall was open, I put in another electrical outlet and mounted the cable tv input on the bedroom side of the wall.

There's only about 17" of this room that is full height. And as I've complained about before, the roof is too low. But after several attempts I was able to mimic the angle and I used the scrap as a template so I could easily cut the rest of the boards I needed. And since I started with 8' long plywood and the wall was 4" short of 8' ride I didn't have to worry about any of the vertical joints.

Pile of shiplap coming off of the table saw

I made a lot of sawdust

First board is installed

Now 2 boards, notice the gap

and now 3 boards. Gap is filled, and I had to notch out for the medicine cabinet
I used finish nails, and I could only put 2 nails in each stud. So that top board only got 2 nails. That first board took an entire work session to get that angle right. Then it took an entire 'nother work session (after work on a Tuesday or something) to get the 2nd board up. Mostly because after I got the 2nd board up I discovered the gap, then got frustrated and walked away. Also, I had already finished the electrical work by the time I started installing shiplap, but didn't get any pictures of that. it's nothing special. But I had the new light fixture boxes installed and the medicine cabinet install locations marked on the studs. So I knew for board #3 I needed to notch out for the top of that. Unfortunately, I thought the medicine cabinet was the width of the studs, and it was actually much more narrow than the stud width.

Shelf supports go behind the shiplap. Notice I marked the drywall so I could remember the location

Getting there!

Cut around the lights, installed the frame for the medicine cabinet

wrapping the other side too

Full view, one shelf support installed

Shiplap is in! For this wall at least

Both shelf supports installed

Full view of the other side
So I had to cut out for the lights, outlet, medicine cabinet, and plumbing. Funny enough, I read the instructions after I installed the frame for the medicine cabinet. They said not to install the frame for a recessed installation. Really should have read those earlier, I guess. I also had to put some extra boards in place outside of the frame. The plumbing connections would not lean out far enough to clear the furring strips and the shiplap! So I had to leave a big hole there. Copper pipes don't bend. It will have to get covered up with a cabinet now.

Be sure to sand the shiplap before you install! There is no sanding here. Sand the plywood to 120 grit after each edge is cut. Otherwise you can get burrs on the edges, and that's a lot of edges.

Do it. Shiplap accent walls are awesome.

Now here's how not to hang shiplap. The drywall went up like shit. It was so bad, Kelley actually convinced me to put up the scrap shiplap over the ceiling in the closet to cover the gap. It may have actually made things worse by exposing how slanted the ceiling is and just how out of square those closet walls are.

Ignore the shelf. that's not a shelf, it's my next post. But that gap in the ceiling drywall

Getting the top of the closet established, and a plywood back

The finished ceiling
Yes, it really does look that terrible. But that's still better than the drywall. And with the shelving and paint, it actually turned out pretty good. Well, decent. but it's up. And that's all the shiplap I can post about.

Wednesday, September 19, 2018

Demo Time!

Also known as "Down comes the Drywall" - this bathroom demo needed to be done over a weekend. This was bad. and I made it worse. We don't know when the addition was built onto this house but it feels like it was done in the 60's or 70's. Shit is just weird in there. I knew there was more space behind the drywall so I needed to get into the corner for that closet space. I knew there was a weird kick out in the wall with the sink that I needed to flush up. I figured I needed to do this all in one weekend - create a massive hole going into the attic and fill it in to block out the heat.

There's the drain pipe that caused the kick out in that wall


Note the single light fixture and purline for the plumbing

Closet wall is open. What's missing but still in the wrong place here?
Our original plan was to open this wall up all the way to the back of the toilet wall and build that out flush. There's a white vent pipe in there, so I knew I wouldn't be able to go all the way back. I didn't expect to see these roof joists back there. But the other thing I didn't notice until it was too late - NO INSULATION! Is that why that bedroom is always hot? It's got attic heat with only a thin layer of drywall between comfortable and the attic.

I had to figure out how the existing drywall was supposed to be attached to the same board that the roof sheeting was against, and how to get some drywall to stick to almost no framing. this just got weird.

Plus, there's insulation on the floor to shelter the bedroom below. Why no wall insulation? why?

it's only weird if you make it weird

the pipe and offending roof truss'

I cut those truss

but still have to drywall around the white pipe
I shoveled back all of the insulation to clean up that subfloor and cut two of the roof truss' to match what was done for the backside of the closet. This is where I really started to screw up. I'm ready to start framing and hang some drywall. Remember this is open attic space in the middle of august in North Carolina. It's fucking hot. My only thought was to seal up the attic space.

Why? Why didn't I just build some standard wall framing and hang drywall on evenly spaced studs? Why didn't I try to get some square corners framed in there? Why didn't I add wall insulation to the existing framing? Well, because there wasn't any evenly spaced studs, for starters. Plus I just forgot since it wasn't in there to begin with. After I was about 90% done with the drywall I realized I should have added some insulation.

First I added furring strips. This did not create a straight wall.

Start hanging drywall against nothing. That's going to work, right?

this should work fine

It got a bit dusty in there.

man that looks like drywall! No major gaps in there at all.

What could go wrong?

that's not even the same thickness

I've hung a lot of drywall in my day, and I've never been very good at it. We were broke as shit this weekend, I could barely scrape together $40 for a single sheet of drywall and all the 2x4's I could get. The rest literally came from scraps already in my shed. So it's terrible. It's far worse than any other drywall I've ever tried. The old drywall is 1/2" thick. The new drywall is 1/2" thick. Why, then, do the seams leave a 3/8" gap in thickness? I don't understand. Why didn't I just frame out some new walls? Why didn't I add insulation? Why didn't I square up any of the corners? I did add 2 layers of 3/8" thick subfloor plywood to the new floor space in the closet. That was pretty satisfying.

But there are massive gaps in the drywall joints. None of the corners are square. Most of the drywall is barely attached to anything. I should have sistered 2x6's up against the existing studs on the sink wall to make everything flush. That wall bends like a batten now. The back wall of the closet has no framing behind it, but I didn't want to put studs in because that would shorten the depth of the closet and make the back drywall more than 48" tall, and I really needed to make 5' out of my one sheet of drywall fit that entire closet back. But how did the closet ceiling go up on the left side? That should not have left gaps like that. One hole was so big I had to cut it out and put in a patch. ugh.

Well, at least the attic is sealed up again. Next up I make shiplap for a curved wall, and some shelves.