Now this blog only gets about 2 page hits per post, compared to my other blog that used to average about 1000 page hits per post. So I hope both of you guys thought that shit was funny....
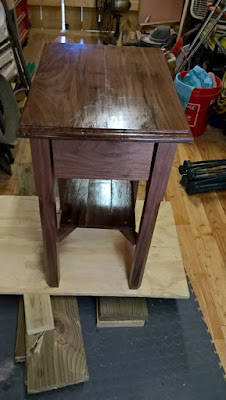
For this walnut end table I did a bit of research on the best finish to apply that would be durable and shiny. Get me that look I wanted. I ended up combining several techniques into something I'm going to repeat. A lot of these pictures are going to look exactly the same, but there are different types of products and techniques applied to the wood instead. So here's what I came up with.
Walnut is a porous wood, so to get a smooth, consistent finish you have to fill the pores. There are commercial products that are grain fillers, but I found a different way and I love it.
1. Sand everything with 80 grit
 |
| Looks a little ashy, eh? |
 |
| Slightly less dusty, but it's a fine dust |
To do this I used tung oil and a 220 sanding block. Wipe on the tung oil with a shop cloth. Before it dries, scrub the sanding block around the wet spot. The sawdust created by the sanding will fill the pores of the walnut. The oil eventually will evaporate, leaving the resin absorbed into the wood holding the sawdust in place. This is a genius approach, and really makes the biggest difference over every other step. You have to fill the grain! Sure, you could use a commercial grain filler, but using the sawdust of the board you're finishing creates a seamless look. Sometimes commercial grain fillers can leave dark spots, or inconsistent coloring. Wet sanding does not.
 |
| Starting to shine |
Repeat the above procedure. Doing 2 coats of tung oil with a 220 sanding block really seals up the grain. Notice how the end grain seems more solid now. Be sure you wait at least 24 hours between coats.
5. Apply a wipe-on satin polyurethane to everything. No need to sand first, but a quick wipedown with a dry shop cloth wouldn't hurt. Wipe-on poly is thinned down some from the brush-on stuff. Use a shop cloth folded tight, wipe with the grain. It will dry quickly, so you may only have to wait 3 hours in between coats.
** special note here - with some projects, it's totally ok to keep on wiping poly and be done. Satin poly doesn't have a shine like the glossy stuff. The coats go on very thin. My mother loves this stuff (Minwax satin wipe-on poly), and she'll put on 9 to 15 coats only buffing with a #0000 steel wool in between. It does make for a fine, sturdy finish to a table that won't leave water rings or anything less protective. For this table, that's not exactly the look that I wanted.
 |
| With satin poly |
5. Sand everything with 320 grit, then wipe on the 2nd coat of poly. If you're doing this on a saturday, you can easily get on a coat after every meal.
6. Sand everything with 400 grit, then wipe on a 3rd coat of poly. This is when it finally starts to "feel" different. After the 400 grit and 3rd coat dry, this table started to feel hard. Like the finish was glass. It was weird, but exactly what I was looking for.
7. Buff with #0000 steel wool, and apply a 4th coat of wipe-on satin poly. Repeat this as much as you want, buff it down and wipe on another coat. The thin layers will add up. Nothing wrong with getting 15 coats on like this. I think I stopped at 5 coats.
8. Wipe only the top with a high gloss polyurethane. I actually used a brush on poly, but wiped it on with a shop cloth anyway. You're supposed to thin it with some mineral spirits before doing that, but I just wanted to avoid brush strokes. I didn't buff with the steel wool or anything, but I did put on two coats. And I just put it on the top of the table and the top of the shelf. All of the legs, sides, and stretchers just got the satin. I wanted to see the difference between what I wanted to look protected.
 |
| You can really tell the difference between the gloss and satin finishes |
 |
| Happy finisher with my shiny table top! |
So after it dried I had to get this table inside to take its rightful place next to my recliner. I built this to a specific size for this location, so we can compare it with the table it's replacing.
 |
| ah, finally in place |
 |
| The drawer fits! |
 |
| you vs the table you've got to replace |
 |
| why not close the drawer here? |
 |
| In it's final home, covered in junk |


No comments:
Post a Comment