Sunday, June 30, 2019

Finish line in sight

Now that the electrical is all up, trim is up and painted, it's really starting to feel like the finish line is in sight. Now it's down to a small punch list of stuff left to do.
Looking good already


Ready for lights


We actually bought a professional grade paint sprayer for this. It's standalone (no air compressor needed), has a feeder that sits in the bucket of paint, and a long hose with a sprayer on the end. I had to move the unit around some to get all three sides of the porch, but I got the bright white paint on everything that will be facing the outside when it's all done. And I know once I get the beadboard and trim on the ceiling we'll need it again, and there are interior projects to paint.....

But having all of the paint done on the outside means I can start hanging cedar. And having the electrical done means I can start hanging beadboard on the ceiling.
First row of cedar

almost made it across

Adding some extra courses


First pieces of beadboard are up


Hanging cedar shake shingles can get weird quick, man. Starting with a 1x4 piece of trim gives me a straight level line. Then the first course gets doubled, so you want to start with the pieces that really look like shit since everything is going to get covered up. Sometimes you might even want to put 3 layers on the bottom row, but I put two up this time. Every course above the first course sits at a 5 1/2" offset from the level line. Don't let any of the seams line up, so every seam between the boards on the inside bottom course gets covered up by the outer bottom course. Some of the outer bottom boards came down below the level line to create some visual interest. Then I started to measure out the lines for upper courses and get some of those boards up. I used a pencil and level to draw on the lines, then fit the bottom of the boards to the line. Be sure none of the edges of the boards line up - any water that gets between the boards needs to fall through to another board (not another seam).

Also you can see I got the first few pieces of beadboard put up. I started with a full sheet of plywood, then a half sheet. Then I went ahead and custom cut a piece to fit between that edge and the chimney. I actually wanted to start running that plywood from the other side, but a bird built a dang nest in the other corner of the beam! There were eggs in there when we checked, so now I have to wait until the dang eggs have hatched and the little birds leave the nest before I finish putting in my ceiling.

Oh well, seems like there is always cedar. And gutters, still have gutters left to go.

Tuesday, June 18, 2019

Proceeding to Power

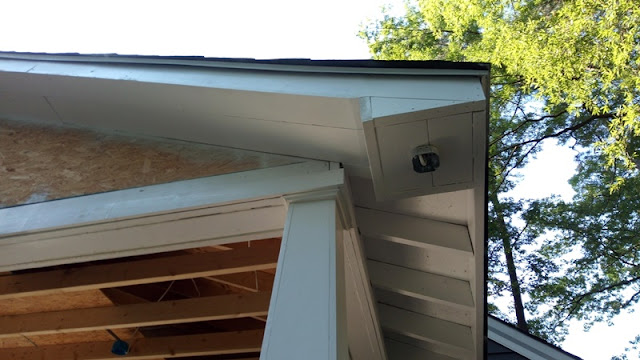
I was going to start the electrical for the porch after I finished some other updates, but the more things laid out the more structured it seemed to get some of these other updates done. The key is that I'm putting lights on the corners. That means I had to put a pork chop on there and attach the light boxes to the chop. Then I had to get the light boxes wired up before I could put the trim on the lookouts, there is no access to that space after it all gets sealed up, so I have to rough in the wiring before hanging the trim. Then paint everything before installing the fixtures. Might as well plan the outlets too, and I wanted to put a switched outlet up top - we like to hang icicle or christmas lights around the rim of these things, it creates a really cool effect.

Right pork chop

Left pork chop


The standard view


So now we begin the electrical rough-in by installing the boxes, then running wire to them with switched and always-on junction boxes in the attic space.

Ceiling fan boxes

light box

outlet on the left side of the porch

junction boxes, continuous on the left, switched on the right

Fan boxes are wired and I got some attic flooring put in as well

left light box is wired up

Here's the feed
On the other side of that porch exterior wall is my youngest daughter's bedroom. As you can tell, there is no insulation in that exterior wall, just like there is no insulation in any of our exterior walls before we renovate those rooms. So hers is next. I'm going to rip out all of that plaster, put in some electrical updates in there, so I wanted to run the porch electrical off of a new outlet that I was going to put in her room. Later I will bring in an electrician to add a new breaker for this circuit. So it starts inside and pokes outside to an outlet. Run up from there to a double switch, one to a switched outlet and the other to the corner lights. The fans and the side outlet are on continuous power.

So why did I have to get the corner lights wired up on the pork chops before painting?

Trim on the lookouts - now the wire to the pork chop is completely hidden


All that trim is done


I ran 1x4 trim around the bottom edge of the roof beams. On the front face, I'm going to hang cedar shake shingles and this board gives me the starting point, the trim on the lookouts is a clean line for the top of the cedar. But I don't want to paint the cedar, so this stuff all has to get painted first, and I have to paint the boxes before I can install the lights.

Here's a street view as well, to gauge the current curb appeal
Fits right in!

Sunday, June 16, 2019

Flynn Down

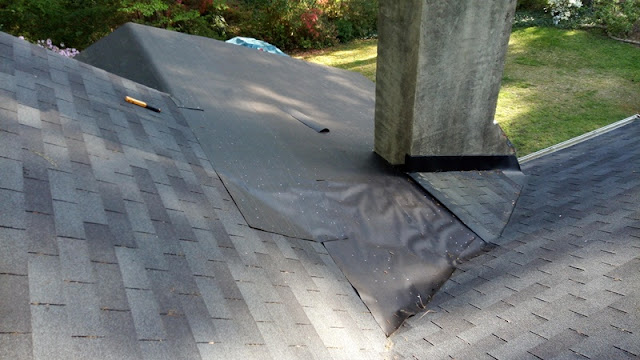
Well it finally happened. A few posts ago I showed how I framed the roof going up around the chimney and mentioned that it leaked. Well this past saturday was the last cool day until the fall, and cool is still a relative term. It was only about 83*, but on the black roof it felt more like 115*. Going to be in the 90's for the next few weeks at least, likely we won't see any comfortable temps outside again in Raleigh until the fall. So it was the one day I had to get that roof stripped (framing and all) and rebuilt ready to shingle.

I got all of the framing ripped off and thrown down first, which was a sweaty mess. Then I got ready to go back up to start taking my first measurement for the new framing. I drew it out with a yellow lumber crayon and went to grab the stuff.

Climbing back up the ladder, I got to the top, put my hands on the shingles, and the ladder completely slid out from under me. It's an 11 foot wall, I'm 6' tall, so I really only fell about 5' down, but that was plenty. I grabbed the gutter to hold on up there, but it wouldn't hold my weight. Holding on did spin my body around as I fell onto the loose bricks & rocks on the ground.

Kelley was doing yardwork not far away, and the kids were making art on the porch. They all came running to check on me. Kelley said my left leg hit first and bent in a way that knees are not supposed to bend, kind of crumpled under me. While I was in the air, I remember thinking I needed to land on bent knees and just go soft all the way down. Funny that after building this entire porch by myself the entire family was out there when I finally seriously injured myself, but I was really glad they were all there to catch up quickly. If I had been alone and had to get myself into the house to get any help it would have been really scary.

So I made it to the ground with my back to the wall, sitting on rocks, and out of breath for some reason. I moved forward into more comfortable ground to assess the damage. Kelley found some scrapes on my right wrist and put bandages on there (so sweet). It was a good 10 minutes before I tried to stand up. Feeling around my left ankle I thought I felt some bones out of place and didn't want to stand if my leg was really broken. After the adrenaline rush wore off the leg didn't feel broken anymore so I got up and made my way inside. But it really wasn't right.

The offending gutter that now needs repair
So rest & ice have helped, but I still think there is something torn below my left knee to the outside. Don't know if it will be muscle or tendon, require PT or surgery, or maybe I'll just need a walking boot or something. My September marathons are probably out, I don't see how I'm going to be able to run for several weeks. I'm still really limping around  and going to see an orthopedist on Monday. And let's not forget that I still have a big hole in my roof!

Wednesday, June 12, 2019

Extra Curricular

Outside of our regular posts about the front porch project, I got in some extra fun stuff.

First, I got to volunteer for a day building houses for Habitat for Humanity again. I literally was breaking up some rocks in the hot sun like I fought the law. Eventually I got to build a shed roof over a little outside storage area with a couple of my coworkers and that was fantastic.

The new shed-style roof
It did get really hot, and I did talk about the porch a lot. Habitat is a great cause and I'm lucky that my company gives each employee 2 days a year to volunteer as we choose. I'll go back for another day in the fall.

There's a guy in that tree - cutting it down


Now that's a big stump


One of the things that has plagued the front yard is the large dead trees. We finally found a tree guy who could get those down for us. We had two red oaks and two pines (from one stump) taken down. They left the logs that were good enough in 12' lengths, I'm trying to find a portable sawmill to come cut them up into lumber for me. There are about 9 logs, mostly pine. The really dead parts of the trees aren't usable, but the rest should be ok. And these were four trees, about 70' tall. Should be a lot of lumber. But this isn't a very accessible part of town to bring large equipment so I'm having a hard time finding anyone to return my call.

Sunday, June 9, 2019

Crazy Roofing

This is where the roof gets tricky. I knew when I started getting around that chimney that the framing structure was going to have to be creative. I hope it works. (hint: it didn't)

Sheeting continues


This part looks good


Now it looks like a real, fully formed porch


Sheeting is all done

Now that's a lot of roof

getting the felt paper tacked up on the back side


Notice that the little extra ledge that was supposed to be the only escape for that water is now gone...

Now this side and the ridge have felt paper
So I wrapped the framing around the cricket and came up with a way to sheet into the valley. This created a flat spot that I'm not very happy about. Pitched roofs should not have flat spots. Now I'm thinking that I should have framed that level area all the way into the valley, then routed the valley back to the end of the cricket. Let's throw some shingles on top and see how that works out.

I'm laying shingles y'all

all the way to the flashing


Up there, but not to the top of the paper yet


Shingled the ridge


Got it tight through the chimney flashing & onto the cricket


Crazy roofer
Finished shingles on the back side

Did all I could to get into that valley. Ridge is done


So the shingles are all done. I still need to get up there with the sealer and caulk around all of the edges and seams (to the existing shingles) with the black tar stuff in caulking tubes. That is supposed to seal everything up tight.