Tuesday, February 26, 2019

Finishing the masonry

Framer in action. This is totally safe.

We're reaching the end of the masonry and boy it cannot come fast enough. My hands are so tired of laying brick. My back aches from mixing mortar and concrete. It's time to be done, there is one column and two walls left to go.

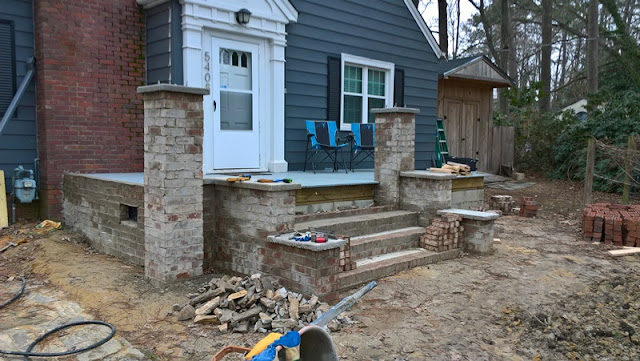
Wall is getting close to the floorboards! And the column is now taller than the floor

This wall still has a ways to go


The finished stairs. All of the bricks are finally in and the stairs are done!! Done done done!!

The front wall is done! Done done done!!!
Finishing off the stairs and that wall is a huge milestone. Especially the stairs. That took forever. It was such a slow process. But the end result is perfect. The stairs have a 7 1/4" rise and a 12" run. They are comfortable and easy to get up and down. And the wall comes right up to the bottom of the floorboards. I'm still amazed that my math actually came out correct on that.

The last column is up!

The last column is finished!! Done done done!!!

It's tall too - almost as tall as I am - 6'
I'm going to wrap up the bricklaying with a tour around the porch. To show off my finished products

Left wall, with the handrail and roof rim/post framed up already

The family loves it

I love this offset detail to bring the stairs out from this post

The stairs

already having fun on the new porch!


The front wall & right 2 columns

The right wall is finished!!! Done done done done!!!
And that is all of the bricks. There is still one other thing I have to do to completely finish the masonry. That last column needs to be filled in with concrete and capped off, with the cap rebar & j-bolts put in to anchor the post topper.

The cap is poured!


It's 2x4's to get the depth of the cap, with 1x6 wrapper to get the height


Kelley added some personalization to the last cap

And it's done! That makes done done done done done!! Topper and anchors attached
And with that, all of the masonry is complete. I'm so glad I can part ways with the mortar hoe for a while. Now I have to get into those handrails and the roof!

Friday, February 22, 2019

Progress is a slow process

I feel like this front porch project is taking forever. I mean, it is a really big project and taking a very long time, I have to work on it after work when the weather is dry enough, but wow I'm really ready to be done with this one now. Or at least see the finished project framed up. Check this out

No posts

One post and header

Framing in action!


2 posts with the inside beam


Finished one of the beams

Framing the first corner


I got the first half of the roof rim finished off! I used a 4' 2x6 ledger attached vertically and to code I used a tapcon anchors every foot plus one extra because I could. First I had to measure on the wall above the front door the height that I wanted the finished ceiling to end up at.

Begin with the end in mind!

Then I drew that level line out to where I thought both headers would end up, then squared a string line with the edge of the 6x6 post on that side. I used a line level to be sure that the top of the ledger would create a level beam out to the post that was square to the house. That level line also gave me the height of the post! So I cut the post with a notch to hold the 2x6 header, then cut the header to length. After installing the ledger board, I put a joist hanger on the ledger and nailed the header from the hanger to the post. Then I had to use the string level again to get the height of the middle post.

I started by cutting the inside of the front beam from between the posts. This gave me a nailer surface to get the inside of the beam from the left wall. The beam itself is a box, using 2x8's on either side with a 2x6 in the middle (bottom of the box). On the sides, the 2x6 bottom can be nailed into the header as well as the outsides of the box, but on the front there is only the 2x8's outside.

But next I have to finish that last brick column before getting anything done on the right half of the roof rim.

Thursday, February 14, 2019

Time for some woodworking

We decided to make shiplap siding for the handrails to give the porch more of an enclosed feeling. Not having ballasts for the handrail that you could see through gives it a cozy, intimate feel. That means I can use traditional wall framing techniques for the handrails. And since I just got a new air compressor for Christmas this year, I bought a framing nailer and was ready to go to town. Let's build walls!

The weather didn't want to cooperate for a while to get more bricks down. I had a few days to fill.

Let them eat posts! 6x6x8' posts to support the roof

I cut, routed, and painted the tops of the handrails before building the actual handrails

Lumber for walls now mixed in with the concrete & mortar. Let's hope they get along

Installed the post toppers and 6x6 anchors to hold the first 2 posts

New air compressor (Craftsman) and framing nailer (Rigid) - and a wall


My eldest got some anime wig & costume - hilarious!

The kids holding the wall in place

Next day I got it anchored to the brick

Also mounted the left ledger board, first post, and the header for that side!!!!!
There was a couple of days when the temps got high enough to actually lay some brick too. Very small pockets of progress can be made after the polar vortex came through.

It's starting to look like a brick wall now!

This side too. getting there!


Next post, I'll get the stairs finished off, make more progress on the roof rim, and possibly finish off the masonry!

Tuesday, February 12, 2019

Finish something else

It's time to start finishing off some of the smaller milestones on this porch project! So far I've got one wall & two posts done, the knee walls are done, and the right post isn't even started.

First bricks on the last column & right walls

Progress!

First course on the last riser has backfill concrete

2nd row of bricks on the 4th step are in place


The column rises

I did tie it in with the front & side walls

Progress is being made!


Right wall going up

Filled in with concrete and rebar

Tying the wall into the column provides stability to both


Now is about the time when my patience starts getting thin. The weather doesn't want to cooperate very much for laying brick. My hands are starting to wear down from all of that mortar. I'm ready to lay some wood and start cutting again. In particular, I had the backfill on the last step to pour and had no idea how much concrete that was going to take, so I needed room in the last column to pour the excess 'crete, so that column needs to be a few bricks higher. I have to tie in the front & right side walls with the column so they need to be up to height. Timing is getting frustrating.

Next post we'll see how that plays out