This was really cool, so I want to share as much as I can about the project. Rajesh is a friend from work who has been wanting to learn woodworking for some time now. He had a standing invitation to come into the woodshop with me anytime and I'll teach him anything he wanted to learn. He has two young sons and wanted to make a set of bunk beds for them, so we came up with a modular format that we could build here, and easily transport back to his house for final sanding, painting, and assembly. He came by the house about 2pm, and by 6:30 we had a fully assembled set of beds in my front yard.
The plans here are pretty straightforward. Build a couple of boxes and six supports. Cut some steps between two of the supports, and run some 1x4 safety rail around the top bunk. Here's the materials you would need to build this bunk bed
- (6) 2x6
- (13) 2x4
- (12) 1x4 furring strips
- (3) 1x4x8' pine
- 1lb box of 2 1/2" fine thread drywall screws
- 1lb box of 1 5/8" fine thread drywall screws
 |
| Truck full of lumber |
We bought this at Lowe's, plus some tools that Rajesh needed. From my shed, we used the compound miter saw for all of the cuts, the framing nailer with 3" and 2" nails to assemble the boxes, and a couple of cordless drills for pilot holes and screws.
It starts with the cut list. Build the supports first
- Pick 6 of the best looking 2x4's, cut from one end 6' 3", then take the scrap and cut 12 1/2" off of the end of that. You now have 3 pieces of usable lumber from each board. Check the length of the last piece, if it is longer than 9" cut it back to only 9". If it's shorter, you used a stud instead of an 8' 2x4, that's fine. Roll with it.
- Use the 12.5" block as a spacer for the last scrap, should be about 9" long. Use 3 of the 2.5" screws to attach the 9" block there.
- Use 3 of the 2.5" screws to attach the 12.5" block to the other end of the 6'3" board. This is one support. Repeat 5 more times.
Next we cut and assemble the boxes
- Cut 2 of the 2x6's and 3 of the remaining 2x4's to 77" long per box
- Cut another 2x6 into two 43" sections per box. Now for each box you have two 2x6's at 77", two 2x6's at 43", and three 2x4's at 77"
- Cut the 1x4 furring strips into 39 1/2" slats. You can get 2 slats per board, so you should end up with 24 slats or 12 slats per box.
- Align on a flat surface the 2x6's on the outside, with 2x4's on the long sides and one in the middle. Put the 43" 2x6's outside of the box sides (so the end grain is exposed on the side, not the end)
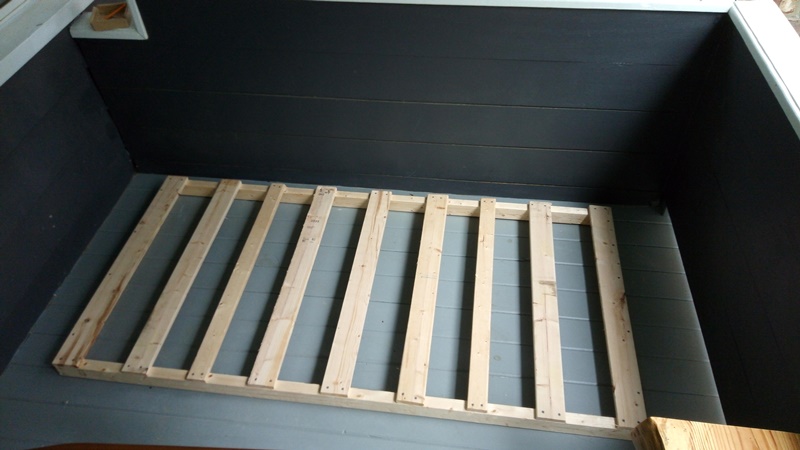
This would have been a really good place to put in a picture of the box before attaching the slats. I really missed the chance to take pictures, we were working so fast through this.
We used the framing nailer to attach the box pieces with 3"nails here. Use 3 nails joining the 2x6 ends into the 2x6 sides, and use 2 nails each through the 2x6 sides into the 2x4 supports. Try to keep the box square while you assemble. You must measure corner to corner to get the box exactly square before attaching the slats. The slats are going to hold everything in place and provide all of the stability.
Use a scrap piece of 1x4 as a spacer. Attach the first slat at the end of the box, then space a 1x4 in between each slat, 12 slats total should space out evenly. Use 2" nails in the framing nailer to attach, 2 nails into each of the three 2x4's. I had almost a full box of these left over after sheeting the porch roof. If you start with a square box frame, you will end up with a stable bed after putting on all of the slats.
For the next cut, you should have one 2x4 left. Cut three 30" sections out of this board for the steps to get up to the top bunk. Grab two of the supports we built first, and a speed square. Use the 2.5" screws (or some 3" nails in the framer) to attach one of the stairs flush with the bottom of the top support block (not on top, but between the two support blocks). Then measure 9" down from the top of that stair and attach the 2nd step. Then measure 9" down from the top of that step to attach the final step.
Next it takes a dry fit. The last cuts are to the 1x4 pine, but we need to get exact measurements after assembly.
Take a box and get it into the front yard. Get all six of the supports out there too. Start with the supports with the stairs and put them on one corner. Add another support to the opposite corner on one side, then attach the three supports to the other side. Use three of the 2.5" screws per support screwing them into the 2x6 outside of the box. Then use a level to get the supports plumb, and lift the top box on top of the 9" support blocks. Attach the supports to the top box using three 2.5" screws per support. Use a level to be sure everything is square and plumb.
Finally then you can add the 1x4 safety rail to the very top outside of the supports. Measure and cut the long sides first, then the ends. The ends will be different lengths, since one end will cover the end grain from two of the side pieces, and the end with the stairs will only have to cover one of these (3/4" shorter). Attach the 1x4 with two of the 1 5/8" screws per support. I suggested using the better grade of pine for these because the final result will be visible. These boards were about $4.50 each, compared to the $2 1x4 furring strips. If you are ok with the way the furring strips look by all means save the cash.
Then, you end up with this:
 |
| Dry fit, with steps and safety rails |
 |
| two boxes, six supports |
 |
| Rajesh the happy dad and new woodworker! |
 |
| I was trying to get a picture of the top bunk with some box details |
Rajesh now has a funny story. First, we cut his supports at 6'8" and discovered that was too tall when he got it assembled at home. Second, his boys are very active, and he's going to add a diagonal 2x4 in between the boxes for stability. Finally, he was super excited to get in and get started. So I cut the first support to 6'8" to show him how the miter saw worked. I told him the way to get good at this was by making a lot of mistakes, it makes you careful. And I've made a lot of mistakes over the last 25 years on the saw. Then he grabbed the next 2x4 and cut the 2nd support. Being very excited about his first time cutting a board with a power tool, he put it up next to the one I cut and noticed a discrepancy. He measured to 5'8" and left it a foot short. So one cut, one lesson learned.
Overall Rajesh had a blast. I really enjoyed getting to design and build this project, it came together really well. He got a belt sander and some white paint, and now his boys are very happy with their new bunk beds. Rajesh was a great student and I absolutely love teaching woodworking skills to people who want to learn. This was a great way to spend a Sunday on labor day weekend.