Showing posts with label Little Roof. Show all posts

Tuesday, April 30, 2019

Finishing the Practice Roof

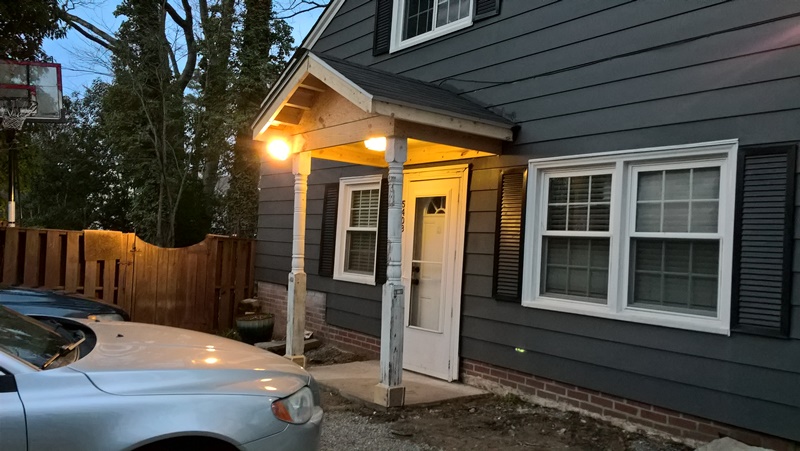
I got all of the finishing touches put on the little roof, so let's see how she turned out! This is the perfect addition to the driveway. We now have a clean and dry entryway to get from the side.

starting to paint some

missed the front of that one trim board - oops

Finishing starts with primer and paint. I used an exterior kilz and Brite White color exterior paint. I started with the columns, then got the trim around the roof. Then primed the ceiling before putting the finishing touches on. The roof trim had to finish the white paint before taking the next step.

All that trim paint


Now I added the cedar shake shingles to the face

Wanted to paint the door and the ceiling the same color


All said and done!


We love this little roof. It was the perfect test project to experiment with the technique before taking on the big porch roof. I added cedar shake shingles to the front. We wanted to paint the door & ceiling the same color, Kelley picked out this salmon (pink but she called it salmon to make me feel more manly about it) and I really like it. Not every house can pull off a pink door, but this one can. It's a bold choice. The house siding was all white when we bought it, we painted the house this dark gray about 5 years ago. I love the gray. Having this little pink accent is a really cool touch. We also did the front door this same pink.

Tuesday, April 2, 2019

Trim and more Trim

On the small test roof we're down to the little details. The hard part that I really wanted to work on was building the roof. Framing to shingles is done. Now all the little grunt work to finish the project. like trim. I hate trim. and I'm not very good at it, but I have to come up with something to finish off this thing.

Me, inside. Note the ceiling joists

Hung the beadboard ceiling and light fixture

Now with an exterior fixture too

The lights even work!

The door trim was half rotten

New door trim!

Trimming out that corner

Added the 1x4 on the bottom of the face and the first 2 boards of fascia

Front fascia is done and cut at the ends

these cuts on the end of the boards is awkward. Need to come up with a better system for that


I ran some of that custom cut cove molding around the beadboard ceiling

Even more cove molding

I added and cut the side board too. Still weird.

It's looking clean, but still have a way to go
After getting the ceiling joists installed, I was able to tackle the electrical. There was a light above the roof, so I had to drop that cord inside the roof. I added a gang box to the center of the ceiling and an exterior box on the left corner and roughed in wiring. Then after I had the 1x4 around the bottom of the exterior and the beadboard (plywood) ceiling installed I could attach the fixtures. Everything worked!

I made a bunch of cove molding on the router for the front porch. Then I installed it around the base of the posts here, and all around the ceiling too. Installed some 1x6 scraps around the tops of the post and cove molding around that. Lots of cove. Cove everywhere.

I trimmed around the fascia with some leftover 1x8 that I had from the front porch. A complete failure on the tapered columns left me with some boards that were the right size for the job. So I installed to cover the framing around the outside of the rim.

The door jamb was originally half buried in dirt because the original concrete pad was too small. That meant it had some serious rot at the bottom. This size concrete pad fixed half of the problem, but I still had to demo the door frame & trim there, and come up with something else. I measured before demo, and a 1x6 on the sides would give roughly the same width. I had to cut the aluminum siding to put the framing against the house, and still needed some way to cover up the cut edge, so for the top of the door trim I decided to go with this wide angle thing on a 1x8. I think it turned out pretty cool, but different from what anyone else would expect!

So in the next post we'll put on all of the finishing touches

Friday, March 29, 2019

Time to build a roof

I decided to put up this practice roof over the door to the driveway using the same technique I'm going to use for the big roof over the big porch. The gable is a fully assembled end that should be exactly the same size against the house as it is on the end of the rim (if you have a square rim). The gable end supports the ridge board, and all of the other roof joists attach between the ridge board and the rim. Then stretch the ceiling joists across the rim so you have something to nail the ceiling up against.

Just the rim, y'all

The gable and the ledger in place


Cut and installed the lookouts

Got all of the joists installed

All of the fascia is up there too


Detail with the lookouts attached through the gable and to the first rafter


Now with more sheeting!


I'm up on the roof! Laying shingles


Now with more roofing

You can see the front of the drip edge here too, I should have gone with one more row of shingles

Looking good! There's progress there
The very first thing I had to do was measure & cut the rafters based on measurements taken on site. I found a rafter calculator online and put in the measurements for the span and a 6/12 pitch, that gave me the initial dimensions. Then I drew on the wall to get the exact specifics. All of the rafters are 2x6's.

So I cut all 8 rafters on the ground first, attached 2 of them to OSB sheeting. Then I drew 2x4 outlines where I wanted them on the edge of the gable, cut out notches for the lookouts. Finally then I lifted the entire assembly onto the top of the rim and stabilized it with some temporary braces. Then I installed the 2 roof joists into the wall, attached with ledgerloc anchors. This was spaced to cut the ridge beam and install it in between the joists, OSB, and wall. With the ridge in place, it was easy to install the remaining roof rafters. I also installed ceiling joists straight across the span.

The rafters were calculated for an 8" overhang, that was the longest I could have and still get 2 rafters out of a single 2x6x8' board. The "lookouts" are the pieces of framing that protrude from the front of the gable. I wanted a 12" lookout including the thickness of the fascia board on front. so I started by cutting a 2x6 into 10 1/2" pieces. Measure from the outside of the OSB on the gable to the inside of the first joist, then add 10.5" to that. Cut a 2x4 by that measurement, and nail the 2x6 to the side of the 2x4 with one end flush. When you get up into the roof, the 2x4's go into the notches cut into the gable and should be nailed in from behind the first roof joist and nailed down into the gable from the top. Turns out, I used too many lookouts.

To install the fascia, start with the boards on the lookouts. Cut the 6/12 angle using the speed square and install both of those front pieces first, then you can measure the exact length for the sides. Again I used 2x6's for all of the fascia.

After the fascia is on I pulled out a few more sheets of that OSB, the sides were exactly 4' x 5' square. So that was pretty easy to make 1 cut each and slide up there. They have to be nailed off every 6" on every rafter and every edge.

After that, remember everything in roofing has to be done from the bottom towards the top, so that everything can overlap the thing below it. Start with drip edge along the bottom, and be sure to leave a gap about the width of your finger to get proper water runoff. Tar paper then has to go on top of the drip edge, I had to put one course on the bottom and then another course over the ridge to get full coverage. Next I installed drip edge over the front, that's supposed to hold down the edge of the tar paper and prevent the wind from blowing it off.

I screwed up the shingles pretty good. You're supposed to cut the tabs off of the shingles to keep the tar melting on the edge, I just turned the first course upside down. Then you put down the first top layer of shings, then cut half of one tab off before putting the 2nd course down and I forgot to do that too. So my tabs all line up. Finally, you're supposed to shingle up high enough to the ridge so that you can turn one row sideways to cap over the ridge without leaving any nails showing. I didn't do that either. Clearly should have gone one more course higher. You're also supposed to cut the siding and put step flashing in between each course of shingles and the wall siding, but my cuts don't come out particularly clean so I used a spray rubber flashing instead. That's not a mistake, it's totally water tight. Just looks funny. But now I know how to shingle the big roof.

And that's where I'm going to leave off for now. There's still plenty of finishing to go here, but now it's "in the dry"!

Tuesday, March 19, 2019

A Practice Roof

I know how I want to build the big roof on my front porch. But I've never really done that before. And with a 10' ridge going out to a gable that covers a 21' span, that's a big roof. Build the gable first, set the ridge board in place, then cut & hang roof joists off of that.

There is another door that goes out to the driveway. We have no garage, so you park the car when it's raining, then fumble in the rain and the dark to get keys out and get into that door. Sure would be nice if I had a little roof to protect that door. There's also a concrete pad to stand on which is crumbling away. The driveway is gravel, so that's no help. And since I just finished doing all of that masonry, my concrete itch can be scratched again.

Before - crumbling and small. I outlined the new concrete area

The form is ready
If you look closely, you can also see that the bottom of the door trim is completely rotten. I started by outlining a 4'x6' area for the new concrete pad, then removed the existing concrete and dug out the area for the form. I used 2x6's for the form, sank 4 steel rods and cut a 10' rebar in half for some anchoring and structural strength. There is some existing concrete there, this part of the house used to be a carport. I had to cut a slant into the form to meet this. The old concrete came out pretty easily, there was lots of old brick & other filler in there.

Filled with 13 80-lb bags of high strength concrete

Preparing the roof rim. Notice the treated 6x6 stubs on the corners

Ledger board is attached

Stood up the rim on these posts

it's pretty cool
It took 13 bags (80 lbs each) to fill the form. I placed a couple of J-bolts in the concrete as well to anchor the posts to the concrete. These decorative posts have been hanging out in the backyard for about 5 years. we knew eventually we'd find a use for them. There was some rot I had to cut out on the ends, and the posts were different lengths. Since I had some leftover 6x6 posts from the front porch, I cut stubs to make the posts the same height at the center, where the turned section started. I planned for a square roof rim at a specific height, so I had to be sure the posts were tall enough to support the roof rim.

Then I cut the siding and hung the ledger board, so that height became set in saw. I nailed the rest of the rim together on the ground, then had to get Kelley and the kids to help me hold it in place while I nailed it up to the ledger and then stood those posts in place afterwards. Needless to say I didn't get a picture of that.

But now the concrete is dry, the posts are in place, and the roof rim is hung. This is where the porch currently sits as well. So next up, I have to actually build the practice roof. Gable end, ridge board, roof joists, ceiling joists, lookouts, sheeting, felt, shingles, trim.