Showing posts with label Kitchen Remodel. Show all posts

Monday, December 21, 2020

Butcher Block Countertops

 When I built the butcher block countertops for my kitchen, the wood was too green. It shrunk in strange ways, and created a wavy surface. Bottom line, face grain countertops are not a good idea, at least from green lumber. 

So I decided to cut up some lumber for edge grain butcher block stock. The plan was to cut some to 1 7/8" wide, glue those wide sides together in sections that would still fit through the planer, then glue the sections together so I could get something about 26" deep by 28" wide and at least 1.5" thick.

Starting with a 16' white oak, 10' hickory, and 6' maple boards

cut them down to length & ripped to width first. Added some walnut and dogwood too

Take those sticks, turn on the side, find combination that gives me length/width needed

In the clamps with glue

Planed down, glued the sections together, cut to width, and sanded

added butcher block oil. Can you see the different types of wood?

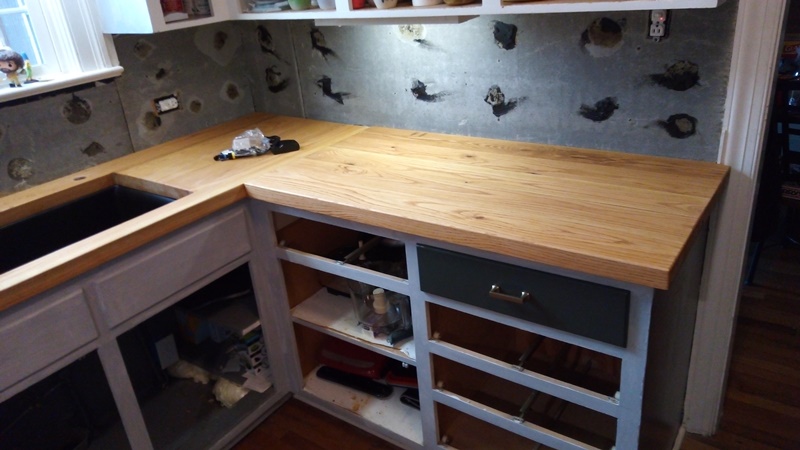
Installed in my kitchen


If you can tell, the first 3 blocks are white oak, most of the general color stuff is white oak. After that, there is a slightly browner board, that is hickory. Then a quartersawn white oak with some visible medulary rays, a row of dogwood that I milled from a tree we had to take down. The walnut (dark brown) and maple (almost white) rows should be obvious. 

I think this patterned edge grain is a fantastic approach. It stays flat, holds up well under Kelley's cooking. Going to have to replace the rest of the countertops with this stuff

Sunday, July 5, 2020

Finish the countertops

We had demo complete last time, ready to install the new butcher block countertops. These had to be cut and fit precisely in order to get a clean install.

Dry fit of the largest piece with a sample of the tile, before the hole for the sink was cut out


Back outside for some stain - really makes the grain pop

This Old Masters stain on the oak was brilliant


Sink hole was cut to size, and it's all stained


Side piece glued down

This small piece beside the stove is finally in too

Love how this finally turned out

Everything lines up smooth

Now with holes for the sink, faucet, and a filter


Plumber got the faucet installed

New disposal & drain

Original vs finished product - quite a difference
Overall these turned out fantastic. The color and grain are exactly what we wanted, the tile is gone and these butcher block countertops are installed and fantastic. I just glued them down, no mechanical fasteners. There were still some gaps in the joints, those got filled in with glue or caulk.

Update: you can see in that picture that the notch fits around the door jamb nice and flush. These were installed a few months ago, and I still haven't put the tile in, and those air-dried countertops finally dried some more? Now there is a 2" gap between that door jamb and the countertop. I think I'm going to end up replacing these with edge grain countertops anyway.

Monday, May 18, 2020

More of those countertops

These countertops are cool, but still kind of weird. I'm still building them, and at the same time, it's demo day!

I rebuilt this little cabinet board

Smashed out the smallest part of the countertops

Starting to paint the cabinets

All of the glue-ups are complete

This is the second largest piece

Everything still needs to be cut to final size, and the hole for the sink is only approximate...

The sink is gone!

Dry fit the smallest piece


When Kelley wants us to put the dishes directly in the dishwasher instead of piling them up in the sink, she means business!

Countertops are gone. Bye bye tile & mirror backsplash


This turned into a wild weekend! We had to demo the old stuff, finish sizing the big countertops, frame the sink, and cut the hole into the big piece for the sink. All before the plumber comes on Monday afternoon!

Monday, April 20, 2020

Forming Countertops

This phase of the kitchen remodel the hardest part is building the butcher block countertops. There are 3 options for building butcher block - edge grain, end grain, or face grain.

For end grain, you glue up blocks and cut squares so that then you can then glue the squares together. Getting the squares the same thickness is really hard, as is getting that many tight glue joints. The benefit is in the cutting surface, it's easier on knives and doesn't show scratches or cut marks. But to do something the size of an entire kitchen countertop? really tough. That's a lot of glue work.

Edge grain is the one that I see the most often. Basically you cut a bunch of boards to random lengths but make sure they are all the same width & thickness. It's a good idea to mix color & species of wood for an interesting visual effect. The time all goes into the prep work, if one board is too thick then you won't get a clean glue joint. You glue the faces together so you can get any length & thickness you want in the butcher block, so it is appropriate for a countertop. Plane the boards to between .75" and 1" thick, rip to about 1.5" wide, and you end up with a 1.5" thick countertop in any length you want.

I went with face grain. The local sawmill sells rough sawn oak 2x6 lumber $20 for a 16 foot long board. I bought 5 of them and had my countertops for only $100. First I cut them to length for the sections I needed, total was only about 13', but I had to pick the best parts out of each board. Then I ran through the table saw to get the boards ripped to width, I needed a 25" countertop so I cut 5 of each length and ripped to just over 5" wide. Then I ran them through the planer to finish dressing. Then it's time to glue up!


Notice the long boards on the back left

That's a nice tight glue joint

That is not going to add up to a nice tight glue joint

Plan 2 for the big section with a sink hole

Glue 2 pieces at a time

The 2nd largest piece


Only hit one real snag. The longest boards had a tough time getting through the table saw for some reason. So I didn't get a good edge for a glue joint. Also I was kind of wondering how to cut out the hole for the sink. So I actually got some decent measurements for the sides of the sink and cut those boards shorter so they would have an easier time in the table saw. Then I was able to get some decent glue joints.

After getting a reasonable glue up there is a lot of finishing to do for these. Scrape and sand everything flat, get the edges treated....

Thursday, April 9, 2020

Starting phase 2 of the kitchen

We're launching into a kitchen remodel, phase 2. It starts with before pictures


The smallest piece of cabinet ever


This green inside paint is actually the new color - I was late


These cabinets are also supposed to get the same upgrades


The plan for this phase is pretty straightforward. We want to replace the tile countertops with butcher block, that is the part that takes the most work for me. We are also going to paint the cabinets and change out the cabinet hardware. The sink is pretty beat up too, so we're looking at a single basin undermount model and a new faucet as well. Fancy stuff there! We're going to finish it off by replacing that mirror backsplash with some ceramic tile.

First step for me is to glue up the countertops. Got to get those formed and ready to install. Then, demo of those tile. Kelley has hated the tile since we moved in here 10 years ago and really wants something flat. This is going to be a ride.