Monday, January 27, 2020

Couple of boards

I picked up a cool piece of maple and cut a charcuterie board out of it. Kelley ended up liking it so much that I can't sell it, it did turn out really cool. After I grabbed the pictures, I added a hole in the handle and a leather strap through it.

Also, my brother Michael wanted me to make something for him to give his wife for Christmas, so of course I was happy to jump on board. I picked up some walnut at the same time I got that maple, sized a chunk out of that and had it engraved. Michael said he wanted a more formal approach to the sign. I had to size the sign (turns out I made it too tall), routed a roundover edge on the table, then after it was engraved added spraypaint to color fill the lettering and put a finish on it. I tried a new finish I heard recommended on a podcast and really like it. Old Masters makes something called Masters Armor, which dries really fast (about 30 minutes) and continues to harden for 24 hours. Pretty neat stuff, I also used it on a bed later.

Picked up some Maple, cherry, and walnut (L-R)

Cut this out of the maple board

That grain pattern is really cool


Michael's sign


There's my brother (right)! I went to visit him for a bit


One of my fraternity brothers sent us some meats & cheese as a thank you for something we did to help his son. The board has a live edge on 2 sides with bark, and I cut a gentle curve on the wide side and a handle on the other side with a jigsaw tilted to about a 10* angle. The board came already planed pretty smooth, but I still had to do plenty of sanding. Then I put on 3 coats of tung oil and 3 coats of butcher block conditioner (wax + oil) to finish it off. All food safe.

Monday, January 20, 2020

A Full Loft

This turned into one of the cutest projects I have sold in this series of beds. First, I got an email about doing a twin loft for her daughter. Then they wanted to change it to a full, ok no problem. They came by to see the shop and this little girl was so sweet. She helped me make some design decisions about her bed and it turned out absolutely beautiful.

It always starts with a full box

Then I added supports. She had a specific height for a sloped ceiling

Added the ladder to get up and started the safety railing


Finished the safety railing and added a cap rail this time with mitered corners


disassembled to paint

Installed in the clients house


There are a few really interesting parts to this build. First you can see in the finished product the height of the sloped ceiling. I needed to make sure the finished height of the bed was about 2" lower than where the ceiling hit the wall. She also gave me the height for a dollhouse and the dresser that she wanted to put under the bed, so I knew the bottom of the box had to be a minimum height and the top of the supports had a maximum height. Generally I need 18" from the top of the supports to the bottom of the box to fit the safety railing and mattress thickness. This worked out.

Second was the ladder. Usually to get into the top bunk I just add some boards in between the supports so it looks like a ladder. This time, she wanted stairs that leaned out. And when the cutest 7 year old you've ever seen asks you to build something like that you just do it. I measured 12" out from the base of the support, used a 1x4 for the sides and some scrap 2x3's for the treads. I set a 2x4 on the platform, with the 1x4 sides leaned in place so I could mark the angles. The bottom angle was cut by using the 2x4 as a spacer, and if you elevate the top side with the same thickness or just wait and draw that line second. Then I cut the 2x3 treads to length and screwed them into the 1x4's. Attach the 1x4 to the supports and you're good.

This time I added diagonal supports to provide some stability. Usually the bottom bunk keeps the supports properly spaced on the floor and stabilizes everything when it gets top heavy. I cut a 45* angle into a scrap 2x3 and then picked a length at random, not measured. Then I repeated that piece 12 times, one for each side of each support. Good news, it worked! This bed doesn't rack and feels stable when you are moving around on top of the mattress.

Top top things off, I added a top cap. Actually, Kelley was making fun of my ability to miter corners, so I both wrapped the frame in 1x6 instead of my normal 2x6, but with mitered corners instead so no end grain would show. That turned out ok, but the boards were a little warped so it wasn't perfect. For the top cap I used a flat 1x3 around all of the sides, with an opening of course for the stairs. These miters turned out really clean! And it gives a nice finished touch to the bed. It's wide enough to set a cup of water on the edge and has a nice aesthetic.

Both kids actually went with me for the install. We also brought a stuffed animal for the little girl so she could have a new snuggle buddy for her new bed. Getting my kids used to operating the drills with a screwdriver bit was... interesting? They got it for the most part. But the coolest thing happened after we left, the client sent me this pictures. We installed the bed and she decorated it all while the kid was away, then got an adorable video when she got home.

Lights, and the dogs? how adorable is that


the whole room, it really works!
Really it's the decorations and lights that make this the most adorable install I've done yet. This was really cool. A fun build for a cool client with a really fun outcome.

Wednesday, January 15, 2020

Some Christmas Tables

The pine slab table that I built for my front porch got some interest from the family, so I ended up getting the rest of that stack of slabs that my mother-in-law till had hanging around the house. They were stacked up, so the one on the bottom was pretty rotten, but there were still 4 in total. One went to my porch, then I had full slabs for tables for my niece Kaileigh and my sister-in-law Martha. The rotten slab I was able to cut out a particularly interesting chunk out of it, and I made that into a smaller table for my SIL Summer. Really caught her by surprise too, she didn't know that was coming.

Ella is cleaning out the rotten slab

This is all I could save out of the 5' long slab

I still carved it down into a clean slab

The bottom had some really neat deformations from the rot and bugs


Starting the epoxy fill for those huge voids

I made this base, and still had to add another platform for it


Martha's table too
I got really slack about taking pictures this Christmas. The stress of meeting all of these sales & holiday deadlines really got to me.

For the small slab, I used a spokeshave and a bunch of sanders & planes to create a smooth-ish surface. Then used the TotalBoat 5:1 epoxy to fill in all of the bug holes and rotten places to create a smooth surface. And after 5 pours of the the epoxy I still didn't have a flat surface. I then sanded again and started with the polyurethane, 8 coats with 000 steel wool buffing in between. Then I made that stand for it with the X legs, and attached that to the bottom of the slab. It was still wobbly, so I added a piece of plywood to the bottom as well and it got a lot more stable. The base was spraypainted gloss black, and some people actually thought it was metal.

Martha was expecting her table, Summer's was a complete surprise. My brother Michael (Summer's husband) also caught her with another surprise, but that's another post. I'm really glad these turned out, and really happy that the family liked them so much! It's fun for me to build things, but building things that are appreciated by the ones you love makes it that much more special.

Thursday, January 9, 2020

Double down on double time

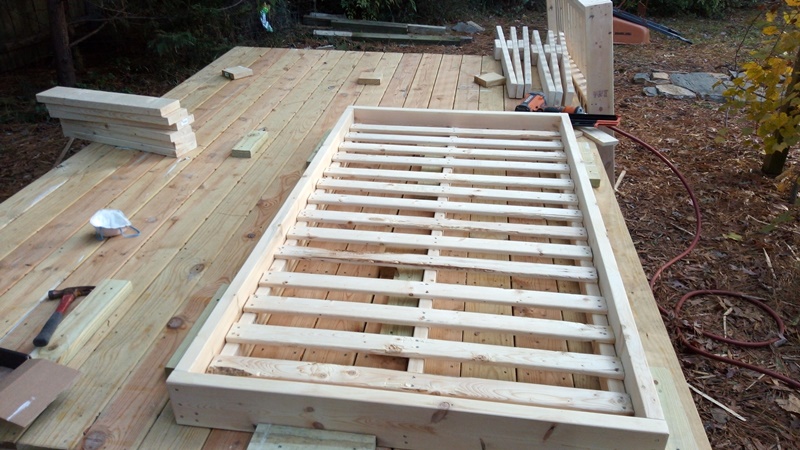
I had all of the components built out but finishing these first two sets of bunk beds was coming to a head. Turns out they needed to be installed on the same day! My fatal flaw was the weather. Putting the deck outside and uncovered just to "stay within the bounds of the law and building codes" whatever that is. The rain kills, it makes my entire work environment for these big beasts useless.

I see 3 beds & 2 slides


Better look at the slides. With epoxy, before paint

Now with more paint


Loaded back into the shed

Notice there's still a ton of lumber down there
So the first set was painted and ready, or at least primed at this point. Time to assemble number 2, a twin over twin toddler with a slide and a climbing wall.

Frames


Assembled with slide


Now with slide and climbing wall?

adding the safety railing

safety rails on the bottom too

all of those vertical pieces on the bottom were a real pain

Ready to paint

down and primed
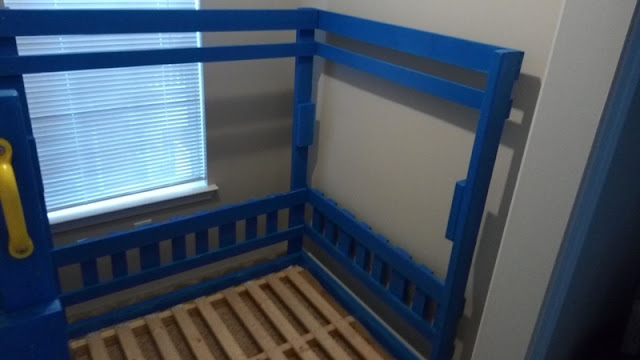
The family for the second bed has a kid flying in from California, so I had to have this one finished on the deadline or the kid is sleeping on the floor. The toddler bed on the bottom had vertical safety rails for some reason, she didn't want the baby getting out in the middle of the night. These people were amazing so I really tried to bend over backwards for them, even outside painting at 11:30 pm with a headlight on just so I could get the deadline complete. Here's how it all played out:

ready to paint?

Yep, they wanted blue. And that is the white bunk bed stacked up on the porch because everything else was taken
So Ella and I delivered the blue beds first. This was a tiny room we had to work in, so we did the best we could. I am glad she is still a teenager, able to get back into the small spaces and use the drill!

Climbing wall is in!

Toddler bed is on the floor

that slide rocked
So in the last picture, you can see that the slide actually passes through a doorway. I went down the slide after we were done, and I did not hit my head on the doorway. Mission accomplished! The safety rails are all in, the mattresses are in, everything is tight but working fine. I heard the kids loved it too.

Ella and I didn't even have time to stop for lunch, we had to get back home, pick up the white bed, and get back out to Chapel Hill for the 2nd install. This one turned out to be much easier

White twin over full, with slide

this was super nice


She wanted to be able to move the slide over to the other side of the bed if needed. The kid absolutely loves this one. There is an update: She called me back to add some handles to the top and tighten up the rail some on the ladder side:

it's a nice touch
I like that, so I'm going to be adding those rails and handles to all of the beds from now on. Well, not those handles but by the color of customer choice. It created an opening that the kid could easily get into at 28" wide, and the handles are a nice stabilizer.

These beds turned out fantastic, and the customers all were very happy with the finished product.