Showing posts with label Interior Projects. Show all posts

Monday, March 9, 2020

Starting some countertops

Kelley has always hated the ceramic tile countertops that were here when we bought the house 10 years ago. Replacing them.... we got a $1600 quote from Lowe's for granite or quartz. Then I went to the local American Woodyard, they had 16' long 2x6 oak planks for just over $20 each. $104 and I had my countertops ready to be assembled. Butcher block coutertops for the win!

I basically needed 3 sections cut up, well really 4 but one is only about 4" wide. So I had to cut those 16' boards into 8', 4' and 3' sections, roughly picking the best sections out of each board. Those things (whole) weigh about 150 lbs each so it was not easy to move around, and the final assembled products were going to be heavy.

16' board in a 20' shed
this stuff is rough cut coming off of the sawmill. The sawmill guy said people normally use those things for barn framing. I started by squaring the ends, then cutting my sections to length. Then I had to rip those things to a rough width on the table saw and run them through the planer. I needed about 25" wide for the final product with all 5 boards edge glued together. The boards all had to be exactly the same thickness for the glueup to be flat in the end. Needless to say, it made a bit of sawdust

That's all oak planer shavings

Sections are cut, ripped, and planed

Also ran some walnut and cherry though the planer - multicolored shavings! So pretty!


That walnut & cherry lumber as well - future projects
I found out just how green that was at that point - it needed time to dry. I bought it on Dec 6, and planed it down Dec 28 2019. Also during that time I built more than a few beds. We'll pick up the countertops again in 2020

Friday, November 22, 2019

More Floating Shelves

I'm finally getting around to posting about finishing Lena's floating shelves. When I designed the shelves it was supposed to wrap an inside corner with a continuous line of shelves. I already got the left side of the shelves put up, now it's time to fit the right side!
Drawing with lengths

Cut out the stack of boards


This is all of the scrap oak I had left over
I started with 2 boards of red oak, 4/4 by about 6" wide rough cut. I cut them to width with straight sides, then got them through the planer and cut out the boards I needed to length. After that, I have to rip out a 1.5" strip off of the side to attach to the wall, add a bunch of holes and seal it with polyurethane.


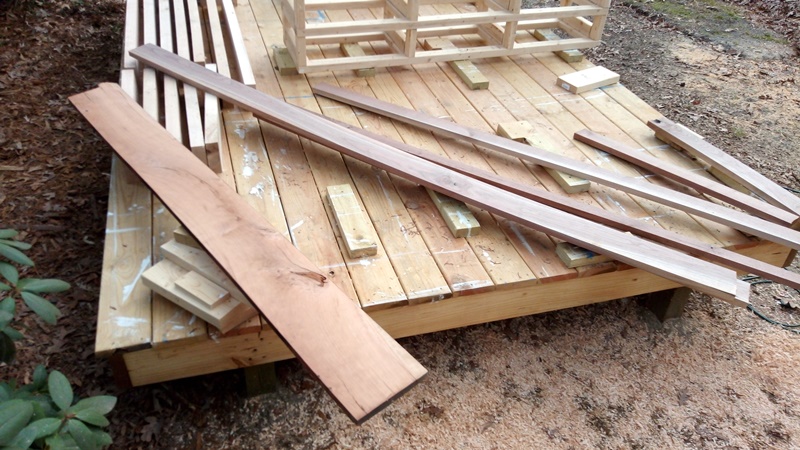
Laid out on the new deck
I put about 3 coats of a glossy brush on poly on each side. Then I marked the stud locations inside the wall onto the strips so I could use a 3" draw-tite screw (with the pan head, like you would use for pocket joints) to attach the strips into the wall. Then I can use dowels to attach the bulk of the shelf and seal the joint to the wall.

Right side wall strips are attached


Attaching the fronts for the top sections


All set!

These turned out super cool. Lena absolutely loves them. I totally got the idea from pinterest but it executed really nicely. Her friends are pretty impressed with her room setup, and I'm really happy with the way it all turned out.
That's my pink-haired girl with all of the ducks decorating the shelves

Friday, October 11, 2019

Pinterest Shelves

After wrapping up my youngest daughters' bedroom remodel, I kept seeing these floating shelves in a zigzag pattern all over pinterest. It looked like an interesting challenge as a woodworker, and we had to lose a cabinet in the bedroom so my Evil Genius needed a new place to display her collection of rubber ducks.

I started by grabbing a 4' level and a pencil. I drew lines on the wall to establish the pattern around the existing furniture, then measured the lines so I knew how much wood to buy. She said she wanted nicer stained lumber instead of painted pine, so when I bought the cypress for the daybed, I also bought (3) 12' boards of red oak. Of course, when they came through the planer one of them turned out not to be oak at all, so I had to dress a 4th board to get the 36' of lumber that I needed.

Assuming you can see the lines for the left side of the zigzag

And here is the right side
 If you can't see those lines drawn onto the wall, sorry. Pink walls aren't the easiest thing to show linework. Trust me, it's going to be cool.

To make the shelves, I'm started by cutting the boards to length, then ripping them to about a 5" width. From there I ripped a 1" strip off of one side that I wanted to put against the wall. My plan is to mark the studs on the inside of the 1" strip, then use draw-tite screws to anchor the strips to the wall. Then add 1/2" holes for 1/2" dowels into both the strip and the main shelf to align and support the weight. These things only have to hold rubber ducks, not books haha

To finish the shelves, I ran them through the planer & tablesaw to shape, then belt sanded with 80 & 120 grit, random orbit sander 180 grit, hand sanding 220 grit. Then I brushed on a glossy polyurethane, 2 coats per side. I didn't seal the edges that go inside the joint or against the wall, but that poly really makes the grain shine!


Getting stained, and you can see the holes drilled into the strip

This is just the left side shelves

Finished sealing

First strip is attached

I'm happy this is coming together

These are all of the strips it took for the left hand shelves

attaching the wide parts

The left side is complete
These turned out pretty cool. I needed to make the holes in the edge of the boards much deeper than I originally thought. This section only took 1 of the 3 boards that I bought, so the right hand side will be twice this much work. It took a lot more glue between the strips and the boards than I was expecting. I'm still kind of suspect about how much weight these can hold, but we'll see. EG loves them so far.

Wednesday, September 4, 2019

Wrapping the room

This bedroom remodel seems like it has gone really fast compared with the larger projects. But after spraying the pink everywhere it wrapped up pretty neatly!

installed the lights and final outlet/switch stuff

They work! We're starting to load the furniture back in as well

our witch is excited to have her bed back and raised up some

Got the window trim back up, and tv hung on the wall


The other window and makeup table

The queen at her station

She loves it!
This turned out really nice. She loves her new room and spends hours at that table in front of the mirror doing her makeup and nails while the tv plays youtube videos. It is a teenager paradise.

Sunday, December 9, 2018

Tour of the teenager

Recently we had a family vacation to the Smoky Mountains of Tennessee. I took some pictures of the recently remodeled teen-cave (like a man-cave) to show off to the family that never comes to visit us, and should share them here too. Not that everything is really done there, but there's enough of interest to share.

These stairs originally had carpet, I still need to paint the risers

Hardwood landing at the top of the stairs  was also under carpet

the bathroom I completely remodeled (got its own category here)

She chose the paint color, we moved all of the furniture up there too. And new carpet from Lowe's.

More furniture

This is the teenager in the double recliner that spurred this entire project

And I wall mounted a big new TV for her and moved up the Playstation

Here's most of the big family on the train at Dollywood

Everybody on the deck at the cabin (even my dad on the end, he got cropped out of the last one)

a cool skin-on-frame kayak mounted on the wall, and a nice canoe shelf

mi familia
So we had a great vacation, and everyone was appropriately impressed with the updates I made to the teen-cave. So much fun, and I got a few new ideas.

Monday, October 22, 2018

Wrapping the bathroom

Well I got the cabinet installed and the sink actually fit on top! I used the plywood strips on the back of the cabinet to secure it to the shiplap wall then secured the sink with caulk. Also caulked around the rest of the cabinet and most of the molding.

Notice that gap between the cabinet and the wall


Then the plumber came and installed the toilet and the faucet, and that is pretty much the end of the bathroom remodel. We still might replace that shower with a glass surround if the money ever appears for it, but that's not cheap so I'm not going to do it right now. Here's the final tour:

We finished painting the bedroom too!

Finished shelves turned out great

Notice there is no more gap next to that wall - caulk

Toilet is installed

Starting to decorate


It's a waterfall faucet - really cool

and the medicine cabinet still opens

Door is hung

Notice how close that 24" door comes to hitting the sink
So that totally transforms this bathroom, both in size and color. We added a new 2'x3' section of heated floor space to the house by bigging up that closet. This renovation turned out better than I expected. And it turned out cheaper than I expected! Here's the breakdown:

Shelves $120
Shiplap plywood $60
Flooring $40
Lowe's drywall/paint/sandpaper/finishing supplies/molding $100
Medicine cabinet $89
Lights/electrical $50
Sink $30
Lumber for cabinet $40
Mike the Plumber $130
Total: $659

I was expecting about a grand. Remember it took less than 40 sq ft of flooring, and we found two boxes of that engineered flooring on clearance for $20/box. The most expensive part was the material for the shelves, that cypress was $3 per boardfoot, but each board was 10' long, and 2" x 12", so 20 bf per plank and I needed one plank per shelf. Instead of the $160 vanity/cabinet we found the $30 sink on clearance and I built the cabinet to go underneath. We took on this project when we didn't have much cash on hand, and by the time we called Mike the Plumber that was settled. This would have been easily $5000 to pay a contractor to come in and do this. And then I wouldn't have gotten the custom cypress shelves and custom cabinet (under someone else's custom sink), and that's all really cool.

This bedroom and bathroom is being setup for my eldest daughter, she told my mother that I was "working on her suite" when she called one time. My daughter absolutely loves it. We're getting the carpet replaced in the bedroom, then going to move all of her bedroom furniture up there. Everybody is happy with the way this one turned out. Hope you enjoyed reading up on the process.