Friday, December 28, 2018

Starting the brickwork

The brickwork on my front porch includes the veneer around all of the concrete block, the posts to support the roof, the handrails on the sides, and the stairs. Lots of brickwork. It begins by digging out for the posts & stairs, dry fitting how I wanted to design the brickwork, and then pouring the brick shelf (flat concrete surface like a footer for the brick). Most of the brick shelf would feed off of the foundation below the concrete block, making that first layer of brick sit on a solid foot of concrete.

The stairs really determined the final height of the brick shelf. The dry fit to run one course horizontally and top it with one course on edge gave me a "rise" for the stairs of 7 1/4". I wanted that rise to happen 5 times and end with the top step including the height of the flooring. So you see flooring and 2 courses of bricks as the top step, then 4 other steps below that. I picked a 13" run and had my stair dimensions on paper.

On the side of the stairs we want to use knee walls to frame it up. Walls that come up about knee high add space for decorating seasonally that Kelley really wants, and I want to use that as a handrail. Plus it adds some length to the stairs. 

For the posts, I decided to use 16" x 16" posts, so 2 bricks square on each side. I do have to fill in the center with concrete and rebar to give enough support for the 6x6 roof posts. I'm going to do tapered craftsman-style tops to support the rim, then build a gable roof. Takes a lot of concrete before I get to start roofing, though.

and a bunch of digging.

Dry stack of the post leading out to the first knee wall

Starting to dig


Outline for the stairs and knee walls

detail of the right side

starting to pour the brick shelf


Now with more wife supervision


Working in shorts and a t-shirt on 12/7/18
then we got a ton of snow on 12/8 - that's my brick & sailboat
First course going down


Got the rest of the brick shelf poured - this is the right post

Finished getting down the first course of brick for the left post, both knee walls, and the first stair


So now I've got my brickwork completely outlined, dug out, dry fit, and the brick shelf is totally poured. The stairs are going to take longer than anything else, every single part of each step has to dry overnight before I can pour the next part. So I'm trying to focus first on the knee walls to frame out the stairs, then build the next part of the stairs every day. Then I'll build up the posts & fill in the fields of the veneer last.

This is going to take a while.

Thursday, December 20, 2018

Ok, actual flooring

Now that all of the floor framing is in place and the skeleton is properly buried in there, it's time to buy and lay down some floor. I did some research on this, and for a covered porch it's actually ok to use tongue and groove flooring so you don't have air access to the crawl space! That also means no water gets under the floor. Unlike the deck we built in the backyard, we used 5/4" PT decking with spacers in between the floorboards. For the front porch, I'm keeping it tight!

Concrete and flooring in the shed

Mr Bones is getting entombed

Flooring is down!


Finally standing on my floored porch - at the right height!

Trimmed up the front of the floor

Got some exterior Kilz down as primer

cut in some porch paint

And the floor is finished painting - for now!
We ended up going with beadboard! The cheaper grade of beadboard at Lowe's comes in 8' and 12' lengths, we needed about $250 of it to floor the porch. Throw in a gallon of exterior Kilz and a gallon of porch floor paint and we're floored for around $300. The floor paint is neat, there is already polyurethane mixed in with the paint. They had a more expensive version with some non-skid texture already mixed in, but we (read: Kelley) didn't want the textured feel to it, just the protection of the poly mixed in. So this stuff is designed to be outside and protective.

We put the beaded side down and kept the grooves tight. I did have to fill in some of the knot holes with Durham's Water Putty. We nailed down the boards with the finish nailer. I hope that's going to hold up over time. The finished height of the floor came out -exactly- where I hoped it would. Those columns around the front door? I did have to pull off the blocks to get back to the top of the ledger board, but it looks like they went back in the same place.

After digging on this project since August, I am so *freaking* happy to finally have a floor to stand on. This is the first part of the project that will be visible in the finished product. Yes I will have to cut the overhang where brick needs to poke through and touch up the paint there. I will also put a second coat of that paint down at that time too.

Now all I have to do is start working on that brick veneer and the roof.

Tuesday, December 18, 2018

Lets get floored

Now that I have a completed block wall and sill attached, it's time to start framing up the floor. I did get most of the ledger board attached last time but ran out of daylight before getting attached to the chimney. After that it takes a doubled up rim joist, then a center joist before hanging all of the floor joists between the rim/sill and center. That's going to take a lot of hangers and pressure treated lumber.

Tapcon screws held the last piece of the ledger board to the brick chimney

Double rim joists going around the outside edge


Rim is complete

installed the flashing below the door and hung the center span

Floor joists starting to go in!
Code requires ledger lock bolts anchoring the ledger board to the house every 12", so I put those in. The block wall is freestanding (not attached to the house), so I didn't really need to follow code, but it is always a good idea to meet code when you can. I also put 4 tapcon bolts into the brick to anchor a 34" piece of the ledger board. All of the floor framing is 2x8 treated pine, including the sill. I put flashing under the door, over the ledger board. Then I used a double 2x8 joist hanger for the center span. The rim is doubled, with shorter boards on the inside perpendicular to the house. Then the front long inner rim attached to that, then the outer perpendicular board. This pattern continues, it creates a zig-zag pattern in the corners and creates something really strong and sturdy. I then used metal joist hangers on both the center span and the side rim joists (even though they were attached to the sill as well - the block wall carries the weight and the hanger is really useless) and ran the floor joists parallel to the house. This way I can run the floorboards perpendicular to the house, which I really wanted to do.

Then the kids got involved

Meet Mr Bones


Kelley saying goodbye to Mr Bones

With a vapor barrier


The kids were pretty insistent on burying a skeleton under there. So whenever this floor has to be replaced, someone else is in for a big surprise!

There is a hole in the foundation that provides air access to the crawl space. Now since there is a block foundation wall up to protect that, it means that under the porch is also considered crawl space. That means I had to put in foundation vents and a vapor barrier under the framing to keep everything protected.

This whole thing started with a story stick, where I drew out the height of everything so I would know how deep to dig the trench for the foundation. This framing is the last element to give me a 3/4" gap below the door or the original floor height to know if I actually built it to the story stick.

Wednesday, December 12, 2018

To the top of the block

After our first wedding anniversary, we went home and I started watching a TV show called "How to Build a Deck". She still makes fun of me for doing that, but hey, everyone has their version of romance. Then the next weekend I started building her a deck on our first house. For our 20th wedding anniversary this year, we went and picked up all of the framing material I would need for the front porch. I hope I get to keep building her decks for another 20 or 30 years!

On our 20th anniversary
Now I'm ready to put all of that pressure treated framing lumber to some good use! Now that all of the block work is done it's time to frame under the floor, and remove the old porch. When I finished off the top course of block, I put in J-bolts to secure a sill plate, so that goes on first. And if my storyboard was correct to begin with, the 2x8 framing should go on top of that and leave exactly 3/4" for the flooring.

Sill plate is on and attached to the J-bolts

Old porch starting to come down
Since the house was built in 1932, what do you think the chances are there is some rotten wood under that old porch? It's a concrete porch so there's no way.

Well, there's a way. How do they always get rotten wood under the doors? They didn't have flashing back then, but this was pretty bad. All I could do, really, was cut away the rot and replace it with PT 2x10 and hope the corner of my house didn't collapse in the process.

rotten wood!

Rot and an open hole into the crawl space

Old porch is gone

at least the block wall came out level


and all I can do is rebuild the floor joists with some pressure treated stuff. There was rot on the joists under the floor and both layers of the rim around that corner. The hardest part was cutting out the rotten stuff to get a clean line so I could put in solid new lumber.

New stuff going in


Even had rot on the 2nd layer


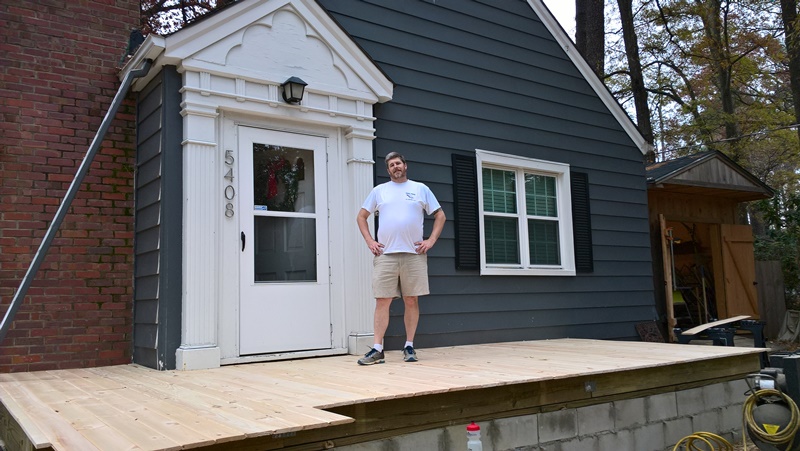
I tried to get a picture from this same angle every day I got to work on it
So after I got that rotten wood replaced I got the ledger board up and properly attached to code using LedgerLock bolts. The floor rim joists were 2x10's, and the ledger boards were 2x8's. The top of the ledger had to be at the right finished height to make the floor come up at the right height. And building code says that flooring must be 3/4" below the front door sill for some reason. And it has to be bolted once per floor joist that you are screwing into, so I put LedgerLock bolts every foot or so just to be safe. By the end of that day (a Sunday), I had all of the boards up except the one that had to screw into the chimney masonry.


Up next, flashing, rim joists, framing, and a surprise!